😀😢😲 Energiser: Wemoji
Learning Objectives
😀😢😲
This game can be played in-person or online with 2 or more participants.
One person will be the “Emoter” and the others will be “Empaths.”
- Emoter, choose a random emoji from the list.
- Emoter, act out the emoji using only facial expressions and body language (no sounds or words).
- Empaths, try to guess the emoji.
- The first Empath to correctly identify the emoji becomes the next Emoter.
Emojis List
❤️ Red Heart
😭 Loudly Crying Face
💀 Skull
🔥 Fire
🫶 Heart Hands
✅ Check Mark Button
✨ Sparkles
😂 Face with Tears of Joy
😊 Smiling Face with Smiling Eyes
⭐ Star
🥹 Face Holding Back Tears
🫡 Saluting Face
🙏 Folded Hands
🤍 White Heart
👀 Eyes
🫂 People Hugging
🩷 Pink Heart
🫠 Melting Face
❤️🩹 Mending Heart
✔️ Check Mark
😍 Smiling Face with Heart-Eyes
🦴 Bone
🗿 Moai
👍 Thumbs Up
❤️🔥 Heart on Fire
😔 Pensive Face
🫵 Index Pointing at the Viewer
👑 Crown
Facilitator Check in questions
Guide participants to reflect on emotional expression and recognition:
- What was most challenging about expressing without words?
- Which emoji were easiest to express, or read? Which were most difficult?
- How does this exercise relate to reading people in real-life situations?
More resources
🎡 Morning orientation
Learning Objectives
Planning during the week
👣 To Do
🎙️ The Facilitator will:
- Assemble the entire group (all volunteers & all students) in a circle
- Briefly welcome everyone with an announcement, like this:
💬 “Morning everyone, Welcome to another Saturday at MigraCode, this week we are working on Module X Sprint 3 and we’re currently working on {summarise what the topic of the week is}”
- Now check: is it the start of a new module? Is it sprint 1? If so, read out the success criteria for the new module.
- Next add one thing you hope to find out or learn about today.
⏰ The Timekeeper will:
- Announce the start of an activity and how long it will take (check everyone is listening)
- Manage any whole class timers that are used in an activity
- Give people a 10-minute wrap-up warning before the end of an activity
- Announce the end of an activity and what happens next
⚠️ Disclaimer
📝Note
This exercise is hosted on the GitHub repository of our partner NGO, Code Your Future (UK), and not on a MigraCode-owned repository. We are part of a European network where we share resources and support each other as we share the same mission - to provide free, high-quality tech education to our communities.
The exercise works as intended — you are free to fork and clone the repository as usual, if required by the exercise. However, please do not make any pull requests to the original Code Your Future repository.
Lastly, if there are any mentions to CYF Slack channels please write a message into our MigraCode class channel instead.
🔗 Workshop: Asking Questions
Asking Questions 101
Prep
- Read this article about Mental Models
- Load this webpage, which stores the problems we will work on today. https://cyf-workshop.netlify.app/asking-questions
Today we’re going to start learning a formal language of developer questions. We will begin with this basic format:
- What I did
- What I expected
- What actually happened
This format helps to find the discrepancies between expectations and reality. (This is the gap in our understanding.)
It’s also an efficient way to share our current understanding with others.
Expectation vs reality
When we are surprised by an outcome it usually means we had a mental model of the world that didn’t predict the world accurately. Don’t panic when this happens, it’s completely expected for even experienced developers to run into surprises. We use these gaps as signs that we need to update our mental models.
To develop our understanding of coding, we will:
Predict & Explain
- Make a prediction by explaining what the outcome will be
- Play computer - “run” the model in our heads and predict (say before) what the outcome will be
Try
- Code up our idea
- Run the code
Compare and Update
- Compare the outcome with our prediction
- Explain the gap between our prediction and what actually happened
- Update our understanding
This process is cyclical.
Updating the right model
If you are stuck and can’t explain the gap in your mental model, then it’s time to ask a question!
When we ask questions, it’s important that we share our current mental model as part of your question so that other people can test the right thing, focus on the mis-understanding. Then together you can get quickly to a shared understanding of your specific problem.
Let’s look at how asking questions helps you update your mental model with an example.
🕹️Inversion, 5m
- Set a timer for 5 minutes.
- Popcorn around the room and each person give an example of a bad way to ask a question until the timer goes off. For example:
Argh I can’t make it work please help me!
Why are these not useful?
🕹️Inversion 2, 10m
- Set a timer for 10 minutes.
- Popcorn around the room and each person give a reason that one of the previous questions was bad until the timer goes off. For example:
What is it? What are you trying to do? In what way is it not working? Be specific! Share what you see. Do you have a link? What do you want it to do?
Exercise ground rules
Before we get to the next exercise, let’s just set some ground rules here:
- The goal is not to complete the exercise; the goal is to learn
- The smart thing to do is to focus on the questions you cannot (yet) answer
🕹️Framing questions systematically, 30m
Split into groups of 2-5 people. Set a whole class timer for 30 minutes.
Confound yourselves
- Pick a problem from the bank.
- As a group, make a prediction about what you think the answer is, and write it down.
- Test your prediction. Try it out using the dev tools.
- Compare your prediction with the outcome.
What happened? Is there a gap in your understanding?
Keep doing this until you find a problem you can’t solve, then write up your mental model using this format:
- What I did
- What I expected. Make sure you include your prediction here
- What actually happened
Include as much context as you can, including links, line numbers, sample code, etc. Use code blocks to mark up your code. If you use screenshots, they should only show the visual render (never screenshot code - paste code as text).
Now post your write up of the question in #cyf-ask-tech-stuff.
🧑🏾💻🙋 Developer questions contain
- 🔗 Links 👍
- Objectives - what are you actually trying to do? 👍
- 🖼️ Screenshots of UI 👍
- 📝
Code blocks👍 - 📷
Screenshots of code🙅
📚 Further reading
🚧 Sharing Our Blockers
Learning Objectives
We call problems that stop our progress “blockers”. We talk through our blockers regularly and help each other get “unblocked” or “unstuck”.
🕹️Sharing Our Blockers
Join our Jamboard here and add your blockers.
Make sure to add only one blocker per note.
Facilitator Once everyone has added their blockers, group similar blockers together.
Facilitator Next, discuss the blockers and help each other get “unblocked”. Start with the most common blocker and work your way down the list.
Hints and Tips
Example Blockers
- I can’t find a Slack channel people keep mentioning.
- People tell me I should be replying to a Slack message in a thread, and I don’t know how.
- I can’t open a PR, because…
- How do I fix extra stray files in my PR?
- I don’t have a computer so I can’t complete my work!
- How do I run Lighthouse?
- Everyone should have blockers. If you aren’t blocked on anything in the course, do you need to challenge yourself more?
- Ask “stupid” questions. Your question is not stupid! What we are doing is hard, and everyone has questions. If you’re stuck, it’s likely that someone else is too. Please help others and ask your question!
- If you have other more advanced questions, do write them on the board but don’t expect to answer them in Blockers. We will work on those in study group.
🍽️ Lunch
At MigraCode, there will be scheduled community lunches throughout the year during which all of MigraCode team will joing and would like to invite you to eat with us. The MC team will let you know when the upcoming community lunch will be. Bring your home-cooked food or buy some food across the street at Glories (e.g., at the Carrefour Supermarket or pick up some to-go meal from one of the restaurants there). We share our time, food and our stories. We learn about each other and the world. We build community.👭👬
On days where there is no community lunch planned you can still stay to socialise here and use the terrace to meet you peers and connect (this goes especially for class days that are longer than just until 2pm.)
Adevinta allows us to use their beautiful space, cutlery, plates, microwaves etc - please make sure to leave everything exactly as it was before so they keep lending their precious space to us ☺️. Ah and make sure to check out the foosball table on the terrace.
🧍 Group discussion: Working with others
We’re all here to learn and grow. Our goals are to become self-sufficient - able to do our own work, and get help when we need it.
We’re part of a community. We help each other, but we’re also each trying to learn for ourselves.
Below are a number of scenarios. Have a group discussion about each scenario. What do you think is good and bad about how people are working? What should they do differently? Why?
Spend on each scenario.
1. Working together in a group on a piece of coursework
Amira, Babak, and Charlie are on a call together talking through how to approach a problem.
They each write their own code on their own laptops, but Babak doesn’t think he could solve it on his own. If he deleted his code, and tried to solve it again after the call, he isn’t confident he would be successful. But he’s really eager to complete the sprint and move on to the next topic.
Facilitation hints
- Understanding is more important than speed.
- Deleting and re-trying exercises is a good test of understanding.
- Working together is good, but everyone needs to leave with understanding.
2. Watching someone solve Codewars exercises
Amira, Babak, and Charlie have a call every week where they watch Charlie solve Codewars exercises.
This is good practice for Charlie. And Amira and Babak find it useful to see how Charlie solves the problems.
Facilitation hints
- Working together is good.
- Seeing how other people solve problems can be interesting.
- Taking turns is better than always being in the same roles.
- Everyone can learn from each other.
3. Asking ChatGPT to solve a problem and copy+pasting the answer
Dara is trying to do a piece of coursework, but isn’t sure what code to write. They ask ChatGPT to solve the problem, and copy+paste the solution into a pull request.
Dara is pretty sure they understand the code, but isn’t sure they could write it again from scratch if they needed to.
Facilitation hints
- Deleting and re-trying exercises is a good test of understanding.
- Submitting copy+pasted code is a waste of volunteer time - people spend time reviewing it.
- No one will hire you just to copy+paste from ChatGPT. You need understanding.
- The point of coursework isn’t for you to complete it, it’s for you to learn by doing it, even if that’s a struggle and takes time.
🗂️ Options
Optional structured activity: Live Code Review
🧑🏾💻 Mentored code review
Learning Objectives
Our learners get feedback on their work through code review. At work, colleagues review each others code to understand code, look for problems, and both share and learn better ways of doing things.
At CYF every learner should get code review on their work every week.
🕹️Live Code Review
Pair up a volunteer with one or more learners.
- The volunteer will review a pull request, and talk out loud about what they’re looking for and doing.
- The learner(s) will ask questions as they do.
Hints and tips
- How did you understand what the goal of the PR is? Reading the title and description, looking at the coursework exercises, etc.
- The uses of the different tabs in a PR: Conversation, Commits, Files changed.
- What made a PR easy or hard to review:
- Where unrelated files/lines changed?
- Was code consistently formatted? Did indentation help or hurt understanding?
- How did you review the code? Did you read top-to-bottom? Did you jump around into and out-of functions? Did you look at tests? Did you clone the code locally and try running it?
Optional structured activity for consolidating Git
🔗 Optional structured activity for consolidating Git
Learning Objectives
Git Day 1
Git is a tool for software development that you will likely come to rely on in your software development journey. It might seem complex at first but with continuous practice, you will begin to disentangle the complexity.
💡 Objective
This workshop will deepen your understanding of Git. By the end of this workshop, participants will:
- Navigate a GitHub repository using the VSCode interface
- Fork and clone a repository, create branches, and commit changes using the VSCode interface
- Articulate the difference between a fork and clone
- Explain their mental model of the working tree and the staging area
Setup
- Break out into groups of 5/6 ( depending on volunteer and trainee numbers )
- Use these instructions as a guide to check your understanding, resolve misconceptions and develop your understanding
This workshop starts with a recap based on this week’s prep material…
Exploring GitHub repositories
Recap activity 🕹️
- Trainees do this section in pairs
- ⏲️ 10 mins
Let’s recap some of the things from earlier in the week.
Visit the following repository on GitHub: https://github.com/CodeYourFuture/cyf-demo-repo
Answer the following questions:
a) How many commits are there in the cyf-demo-repo project?
b) Who committed on Oct 31, 2020?
c) What changes did illictonion make in the commit titled “Revert changes accidentally pushed in the past”?
d) How many files were added in the first commit? What were the names of the files?
e) What is the hash for the first commit in the history?
f) What is Claire Bickley’s favourite food?
🧵🗣️ group discussion
- Group discussion
- ⏲️ 10 mins
- A volunteer will need to facilitate this section
A volunteer can facilitate this group discussion by going through the questions above and asking pairs for their feedback. If pairs are unsure / not quite accurate then spend a small amount of time addressing misconceptions. Remember to ask around for feedback.
Creating a fork 🍴
🕹️ Recap activity
- Trainees do this section in pairs
- ⏲️ 5 mins
Use the guidelines from the prep section of this week to create a fork.
- On one person’s computer, fork this repo: https://github.com/CodeYourFuture/cyf-demo-repo
- 📝 Double-check the URL of your forked repo. How can you tell the fork was successfully created?
Group discussion/demo 🧵 🗣️
- Groups discussion
- ⏲️ 5 mins
- A volunteer will need to facilitate this section
A volunteer will need to navigate and let the group guide them in creating a fork.
🌀 Cloning a repository
🕹️ Recap activity
- Trainees do this section in pairs
- ⏲️ 5 mins
📋 Check your understanding
Before continuing, try answering the following:
❓ what is the difference between a fork and a clone.
Remember to check your answer before continuing.
- Clone your fork of
cyf-demo-repoto your local machine. - Open this local repository using VSCode.
- Use
pwdin your terminal to check you’re in the right place.
Group discussion/demo 🧵 🗣️
- Group discussion/demo
- ⏲️ 5 mins
- A volunteer will need to facilitate this section
A volunteer will need to navigate and let the group guide them in following through the steps in the previous recap activity.
🌳 Creating a branch
🕹️ Recap activity
- Trainees do this section in pairs
- ⏲️ 10 mins
Next, create a local branch called week-1-workshop
Group discussion/demo 🧵 🗣️
- Group discussion/demo
- ⏲️ 10 mins
- A volunteer will need to facilitate this section
Take a break for 10 mins… 🍫
Part 2 - New skills 🧰 - Committing and pushing 📸
🕹️ Activity - Figure it out 🔍
🎯 Goal: Make some local changes and create a local commit on our branch.
- Do this section in pairs
- ⏲️ 15 mins
Follow these instructions carefully.
Our Git timeline starts with some commits like this:
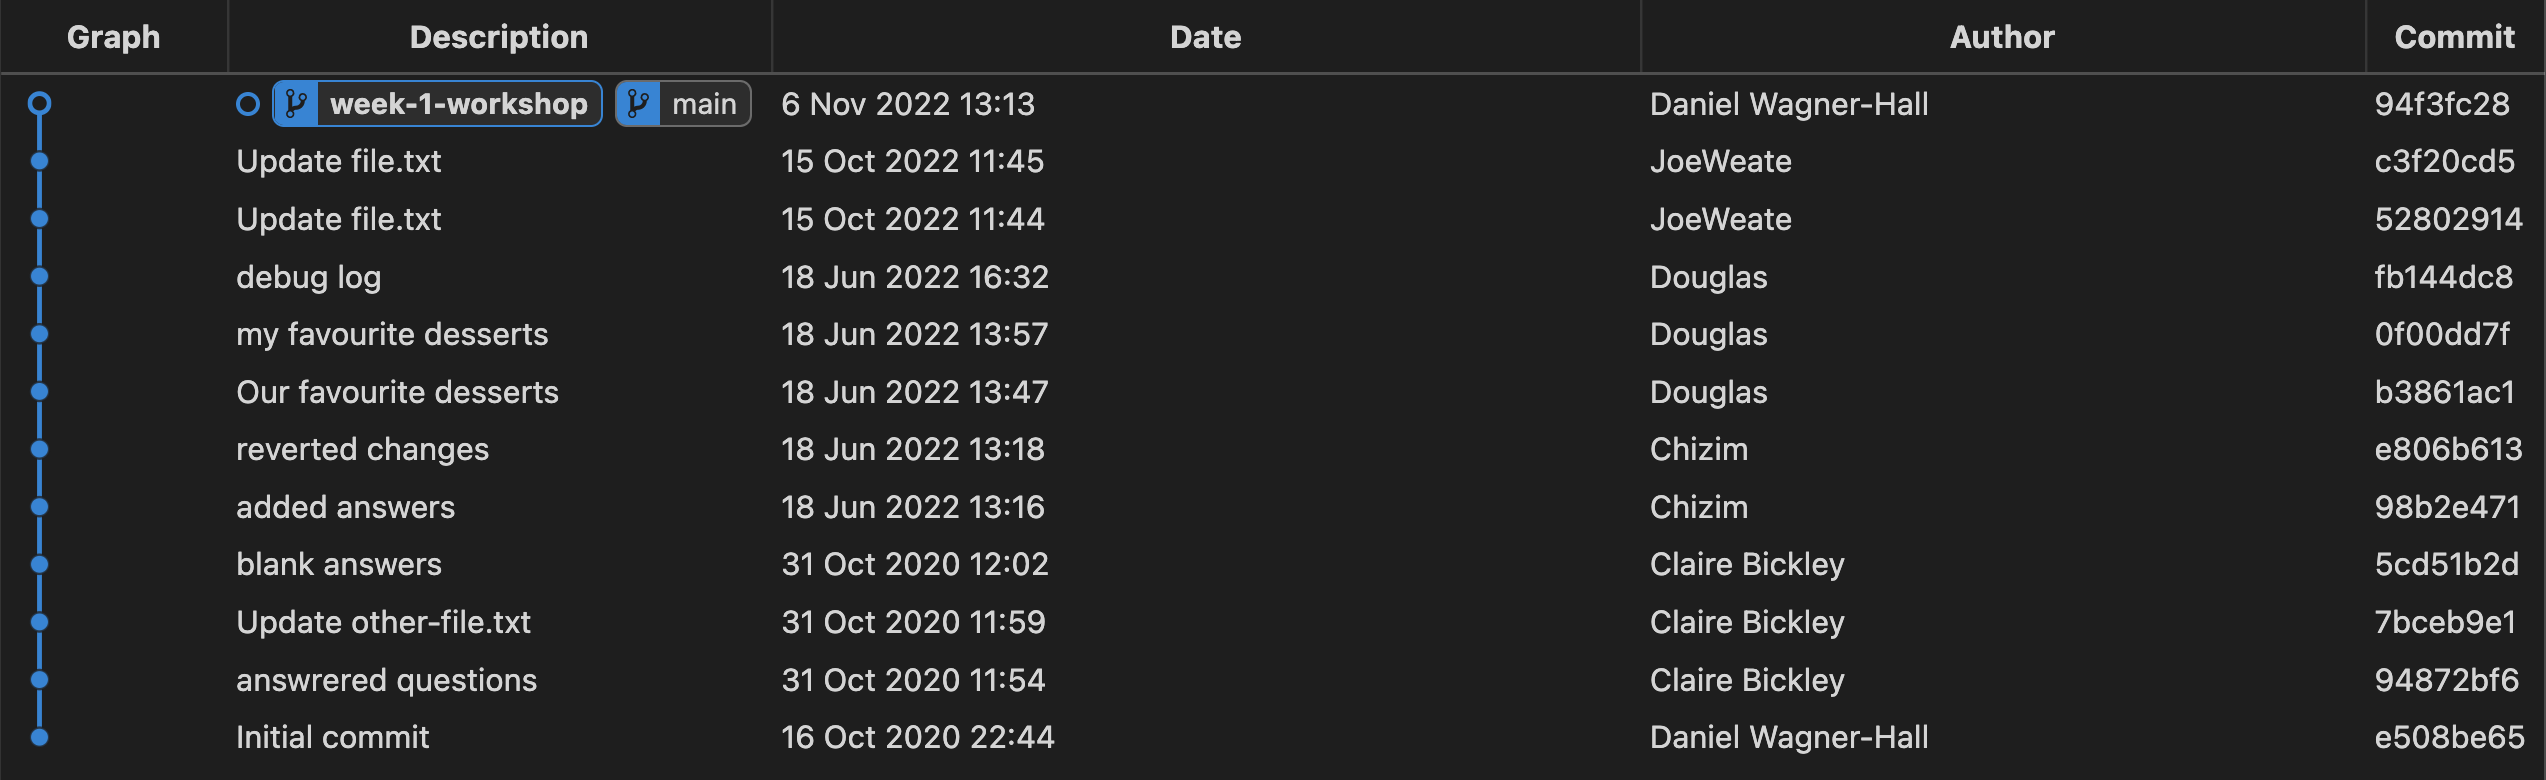
We’re going to figure out how to
- make local changes and commit them to our branch “week-1-workshop”,
so our history looks something like this:
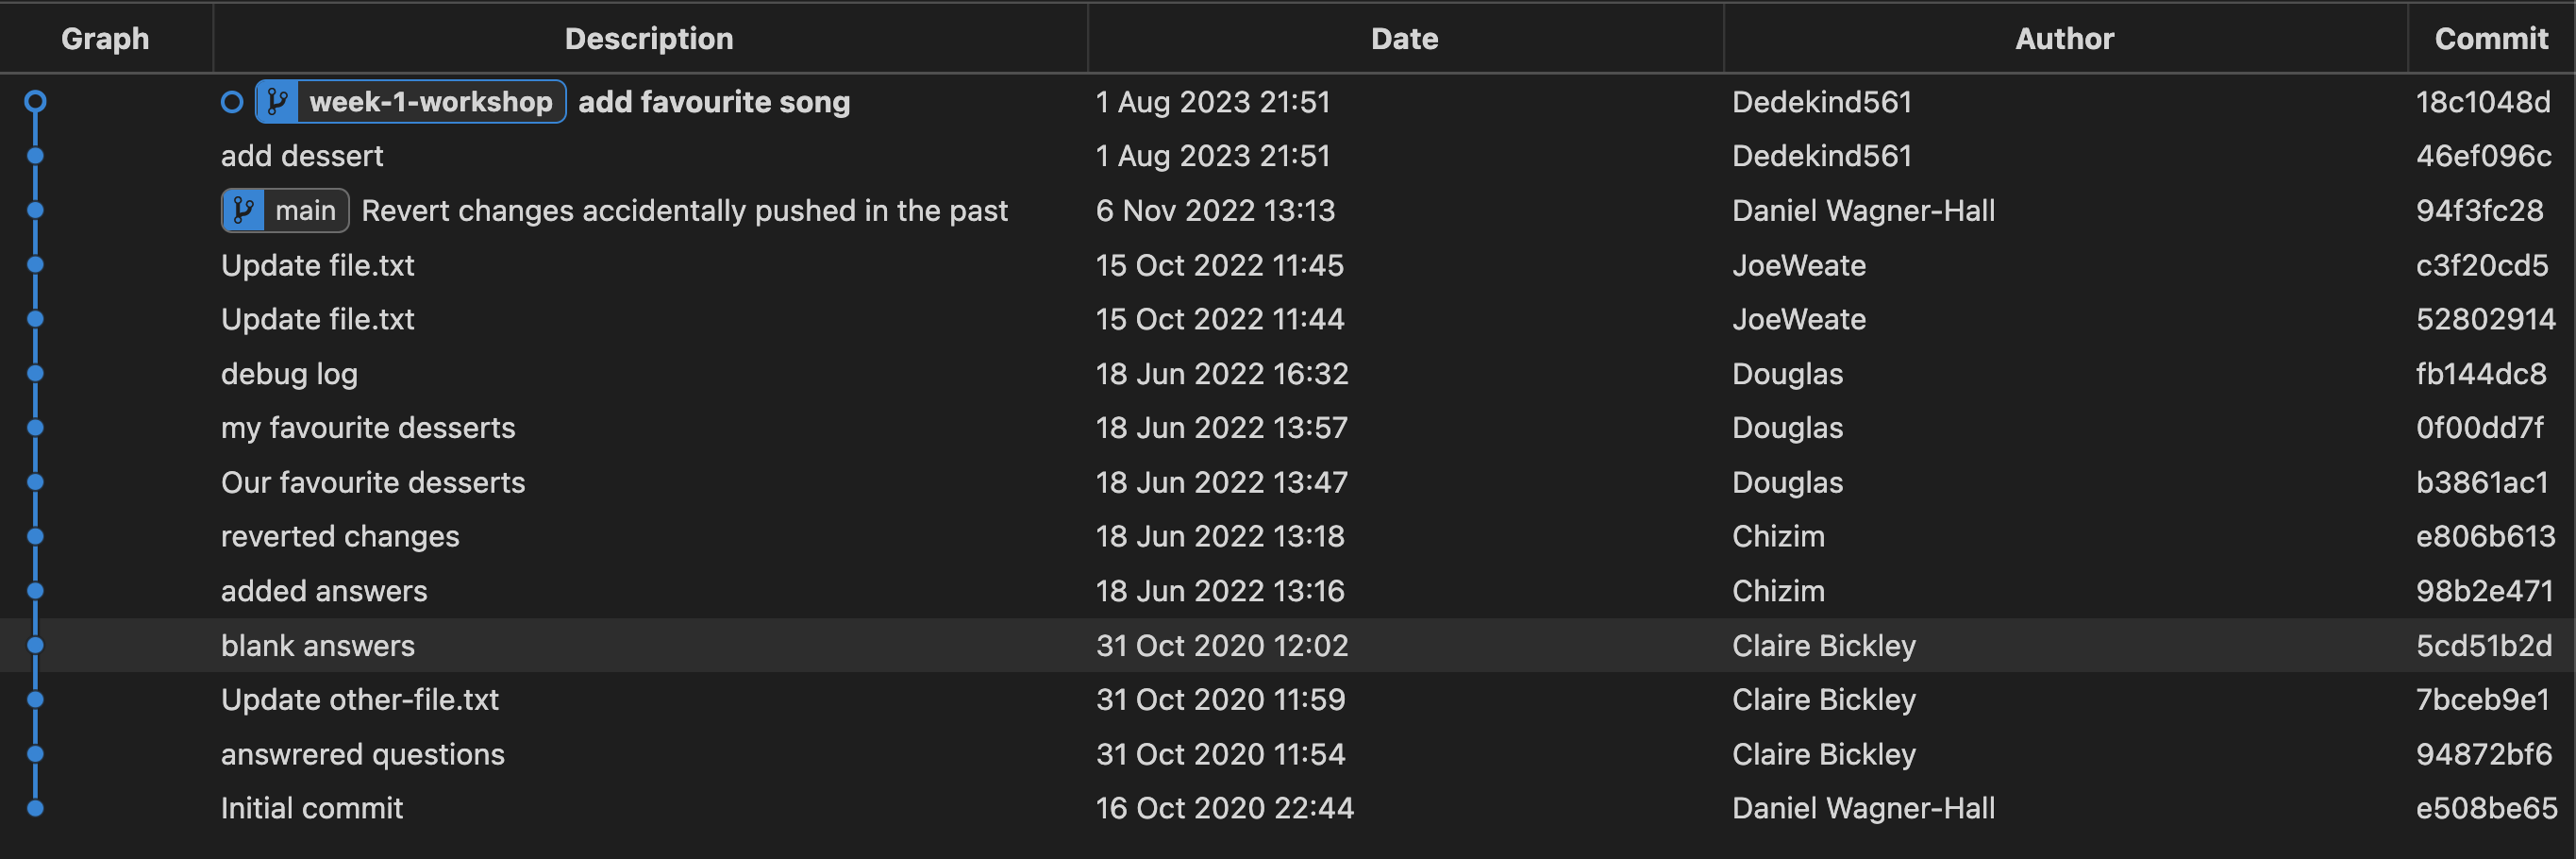
where the most recent commits contain our changes.
To create a commit, we can use the following steps (explained more below):
- Make a change to a file
- View the local changes
- Stage the changes
- Creating the commit
🗄️ 1. Make a change to a file
- Open up your local repo
cyf-demo-repoin VSCode. - Go to the Explorer section of VSCode ( look for a 🔍 icon ).
- Find
file.txtand edit the file with the answer to the questions. - Remember to save the changes to
file.txt.
Tip:
- You can use Cmd + S on a Mac to save changes to a file in VSCode.
- You can use Ctrl + S on a Linux OS to save changes to a file in VSCode.
🔬 2. View the local changes
We want to view the changes we’ve just made to our working directory.
- Locate the Source Control tab in VSCode.

- Go to the Changes section and click on the file you changed - this should now show the changes for the file.
- Try editing the file again in the Explorer tab and check to see the update is visible in the Source Control panel
🟢 3. Stage the changes
We need to tell Git which changes we want to be part of our next commit.
Each commit is a checkpoint we’ve decided to save. When making a commit, we can decide to not include all of our changes in the checkpoint, but just include some of them.
We choose which changes we want to include in a commit by staging our changes.
In the Source Control tab again…
- Go to the file
file.txtand click on the +.
👓 Notice what happens when you carry out step 1.
- View the Staged Changes area in your Source Control panel.
📸 4. Create the commit
Once we’ve staged our changes, then we can commit these changes.
Before we do, we should make sure we’re on the correct branch. Check that you’re on the week-1-workshop branch.
Your VSCode window should look like this: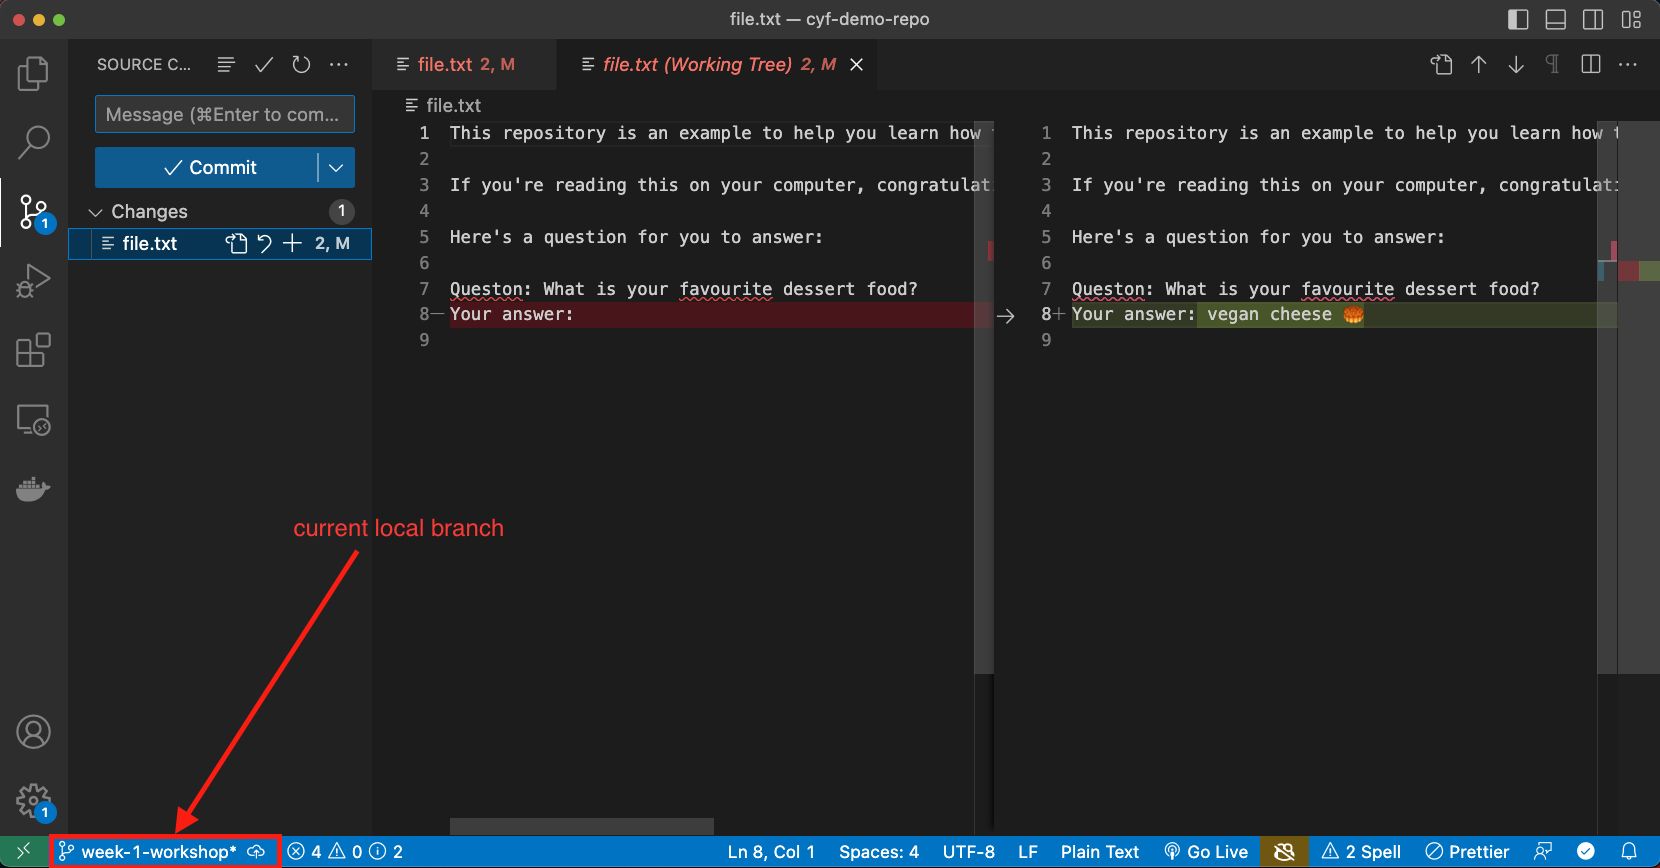
and not like this:
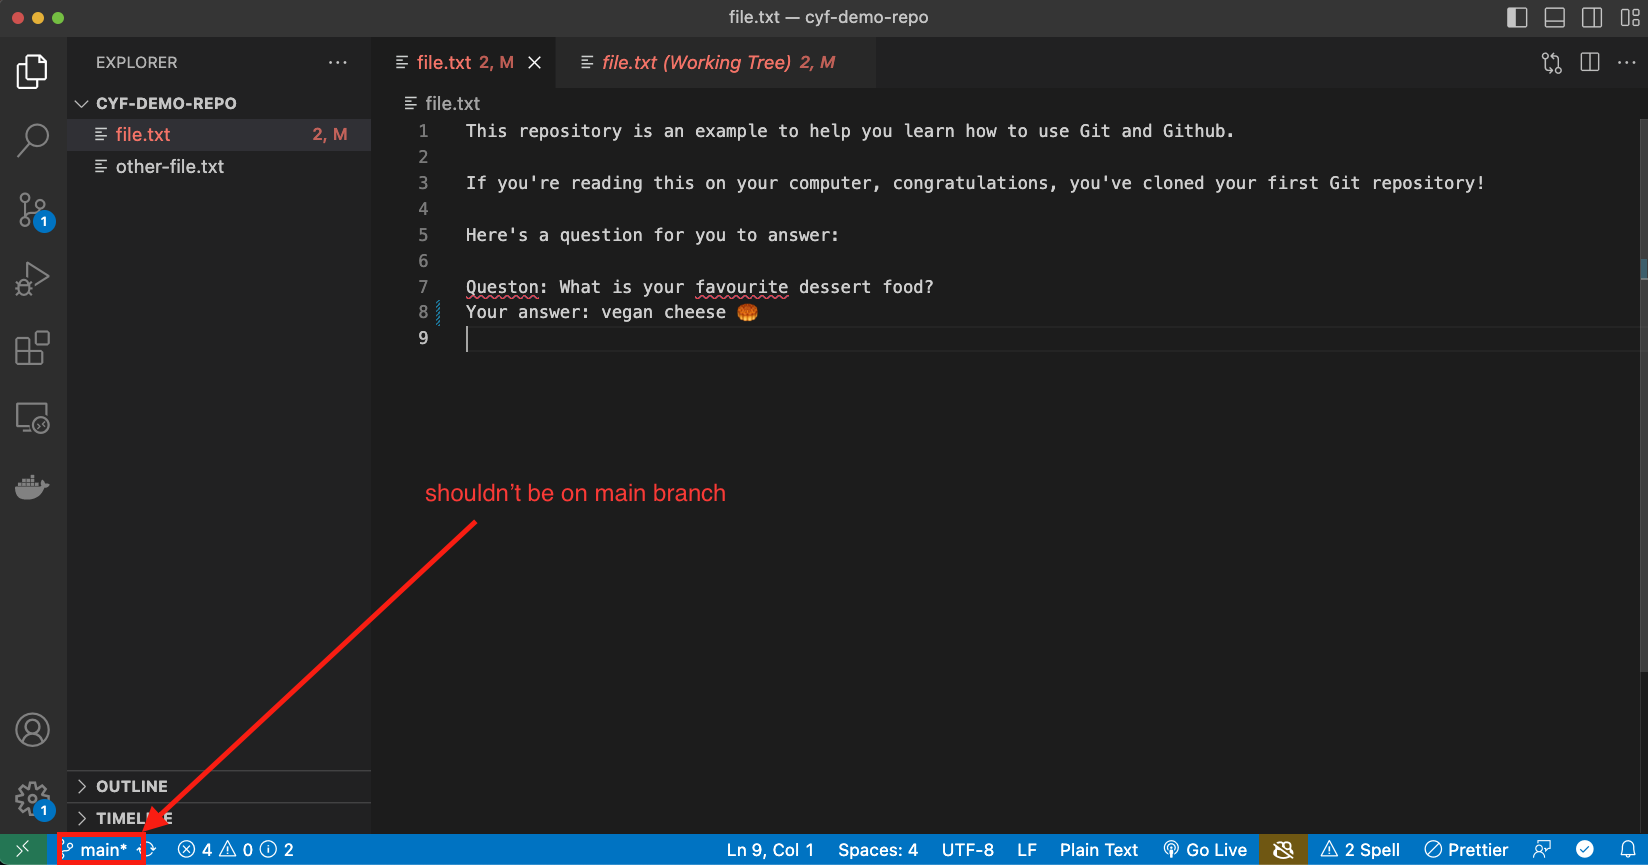
If you’re sure you’re on the right branch:
- Enter a commit message describing briefly what you did in your commit.
- Click Commit to create the Git commit.
📝 Now figure out how many commits you have on your local machine.
🧠 Explain what you think would have happened if you didn’t stage anything in your working directory when you made your commit.
When you’re finished…
❗ Once you’ve completed this commit, swap roles in your pair. Choose another file and then go through the steps in the Creating a commit section
Group discussion/demo 🧵 🗣️
- Group discussion/demo
- ⏲️ 10 mins
- A volunteer will need to facilitate this section
A volunteer will now need to navigate with directions from the group. Go through the git commit steps together. Also use this time for clarifying questions.
🫸 Pushing
🎯 Goal: Push a branch to a remote repository
🕹️ Activity - Figure it out 🔍
- Trainees work in pairs
- ⏲️ 5 mins
After committing your work on your machine, you’ll have a local branch that looks like this
📋 Double-check you’ve been committing to your branch week-1-workshop branch and not your main branch.
However, our remote fork only has a main branch:
In other words, we have not added our local branch onto the remote fork on GitHub.
To do this, we must push our branch onto GitHub.
push means adding local work to a remote GitHub repository.
🔍 Figure out how to push your local branch to the GitHub repository using the Source Control interface in VSCode.
🔍 Figure out how to check the week-1-workshop branch is on the remote fork.
Group discussion
- Group discussion/demo
- ⏲️ 5 mins
- A volunteer will need to facilitate this section
A volunteer will need to navigate and let the group guide them in following through the steps in the previous recap activity.
🧵 Tying things up
Now is some time to wrap up and discuss some of the key concepts from this week.
🗣️ Discussion in pairs
- Trainees discuss in pairs
- ⏲️ 10 mins
In your pair, discuss the following questions/tasks:
- What is a commit? Explain why we need to make commits when we’re developing a project.
- Explain why we store repositories on GitHub.
- Describe the purpose of VSCode.
- Explain the difference between Git and GitHub.
- Explain why developers use branches.
- Explain the difference between a fork and a clone.
- What does the branch name
origin/mainmean instead of justmain? - Check out the following git repository diagram below:
How many commits are in common between week-1-feature and main?
🗣️ Group discussion
- Discuss the questions together as a group. Go round and get feedback from each person in the group.
Wrap
You are done for the day. Take a moment to reflect on what you have learned and achieved.
Stand in a circle and share:
- 📛 your name
- 💪🏽 one thing you are proud of today
- 👷🏾 the task you are going to work on next
- 🛟 one thing you need help with
Give yourselves a round of applause. Now you have earned your rest. Usually people go for a cup of tea or a pint after class. You are welcome to join and wind down together.
☕ Optional: Socialise!
Learning Objectives
At MigraCode we learn as a community. You’re going to be spending the coming months with the people around you. After that, they will form part of your professional network too.
We encourage you to spend time getting to know them! This is optional. But after class, we encourage you to do something like:
- Go sit in a nearby park together.
- Go to a local cafe for hot drinks.
- Go to a nearby bar.
- Or any other ideas you have!
Make sure everyone who wants to join in will feel welcome wherever you go (e.g. a lot of people might not like drinking or being near alcohol).